Worker Services – Net Core 3.0
Hey, mates, today I’m writing about worker services using net core 3.0. I hope you enjoy it 😉
We’ll start with the requirement 😮
Business Situation 😮
We have an app that inserts emails in a SQL table called Emails with a status PENDING_TO_SEND.
Every day, this app populates the Email table but the problem is: Who will send the emails?
Ok, we start to analyze this problem, and finally, we decide to build a background service that checks the Email table every 3 minutes and if there are any email with status PENDING_TO_SEND, it sends these to recipients.
In the past, we should build a WINDOWS SERVICE. However, we are going to use net core to create the Background Service, for this reason, we will create a WORKER SERVICE.
What is a Worker Service?
Basically, it is a service that RUNS in background continually.
What is the difference between a Windows Service and a Worker Service?
A worker service belongs to the DOTNET CORE Stack, for this reason, it’s cross-platform.
A worker service can run in different Operating Systems.
In Windows, a worker service runs as Windows Service.
In Linux, a worker service runs as Daemon.
In addition, you could deploy worker services in Mac OS too in according to the Microsoft documentation.
Background Service class & IHostedService Interface
Background service in ASP.NET Core implements the IHostedService Interface. For this reason, It needs to implement 2 methods:
- StartAsync(CancellationToken): contains the logic to start the background task.
- StopAsync(CancellationToken): triggered when the host is performing a graceful shutdown. This method contains the logic to end the background task (Release resources)
BackgroundService is the BASE CLASS of background tasks that implements IHostedService Interface. In addition, this base class adds a new method: ExecuteAsync(CancellationToken) where it will be the Service Logic!
We can override any of the 3 main methods to customize our logic.
Creating our worker service 😉
First, we need to create our project, we will use the worker service template for dotnet core 3.0.

When finish the project creation, we have the following structure:

We can see the program.cs

In this class, basically we register our HostedService (our background service), by default our main class is Worker and in this class, we need to put the business logic. In other words, the Worker class is the start-up business class, it’s our background service!

You can see that the worker class inherits of BackgroundService Base class.
By default, in this class, we need to override the ExecuteAsync method because we have our business logic inside it. Right now, this method is executed every 1000ms, that is, the method executes its logic, sleeps for 1000ms and wakes up again.
In addition, you can see basically this method receive a stoppingToken. This token is received when we stopped the service. Of course, the method StopAsync is triggered too.
We have a look at Background service class:

We can see that this class implements IHostedService and IDisposable Interface. Furthermore, this class adds the ExecuteAsync method.
Finally, we can see the IHostedService Interface:

A curiosity, it is that we can run this project and you can see debug information in a console. That’s great 😀 because in the past when you were coding a windows service you couldn’t testing directly the solution, you needed to install your service. Of course, this console is showed only in DEBUG but it is great 😉

Let’s come back to the business problem 😉
Ok, we need to check the Email table every 3 minutes. For this example, we have 2 services:
- EmailService: represents a service that interacts with the repository to retrieve email data from the database.
- SenderService: represents a helper that sends emails via SMTP.
Of course, we are going to use DependencyInjection. You need to know that our HostedService: “Worker” has a Singleton Scope. For this reason, we create our service with the same scope.
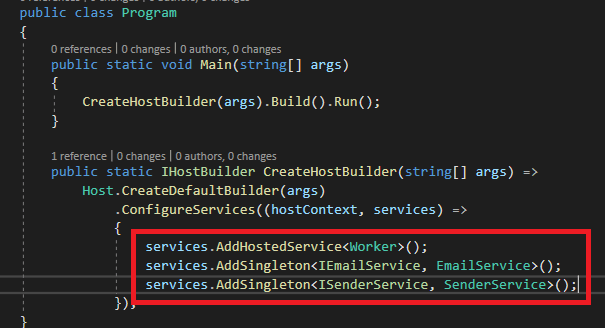
Finally, we are going to:
- Inject IEmailService and call the SendPendingEmails() method inside ExecuteAsync() method.
- Update delay to 3 minutes.
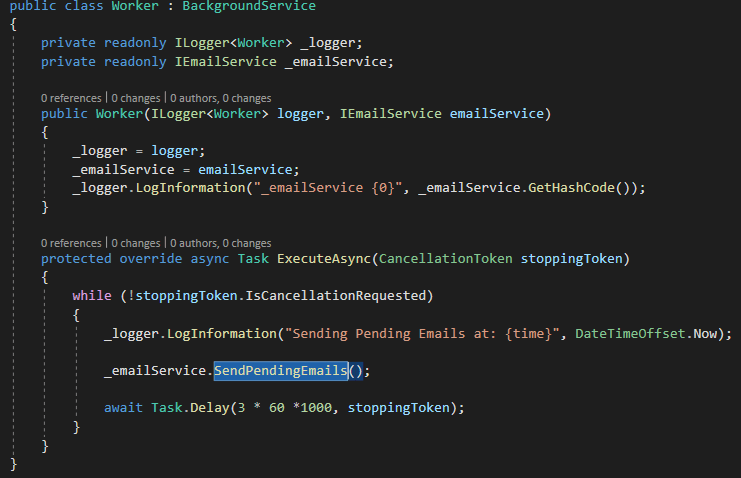
The logic inside the services is not important because it’s only illustrative.
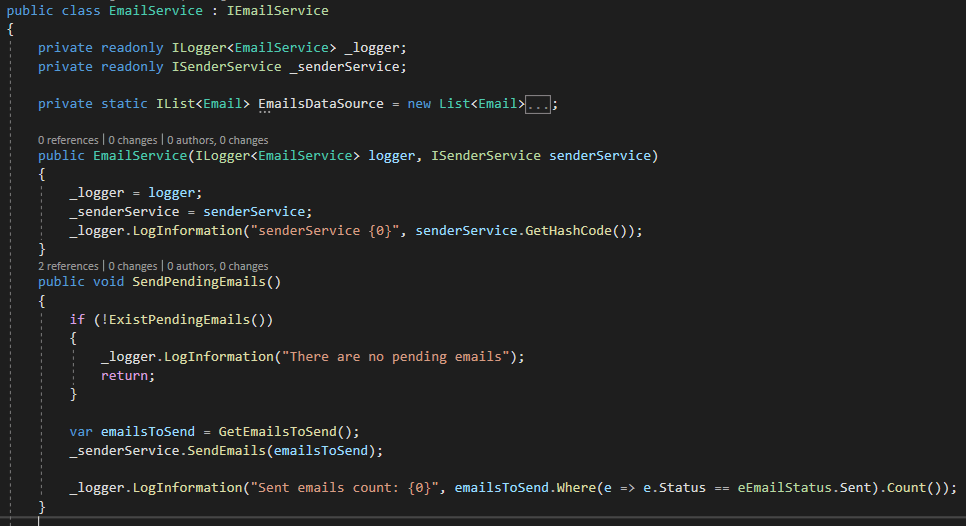
Our project works 😀 but we have a problem when we deploy this worker service in production, we won’t have any way to see the status of the service because we don’t have a logger and in production, we won’t have a console.
Integrating Serilog
Ok, we’re going to do a basic Serilog integration to this example. First, we need to install to NuGet packages:
- Serilog.AspNetCore: logging support to asp.net core
- Serilog.Sinks.File: allows writing logs in a file

Updating the main configuration class.
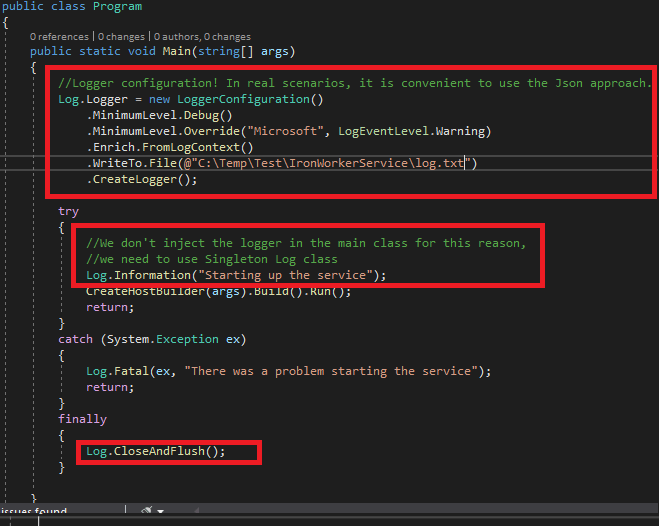

That’s all! Let’s test that 😉 Excellent, the worker service created a new log.txt file and logger all event inside it 😉
In addition, you can see how the service wakes up every 3 minutes (3 iterations in the pic)

Overriding main methods 😉
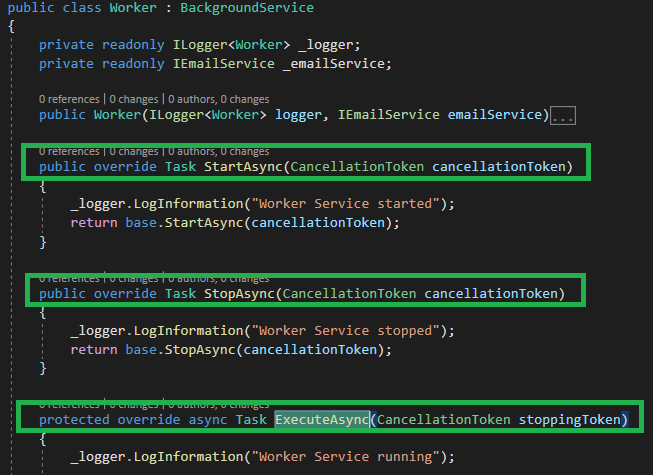
Finally, we’ll override the main methods:
- StartAsync(CancellationToken)
- StopAsync( CancellationToken )
- ExecuteAsync( CancellationToken )
ExecuteAsync has already been overridden. However, we’ll override the other methods to log some information.
Installing the worker service 🙂
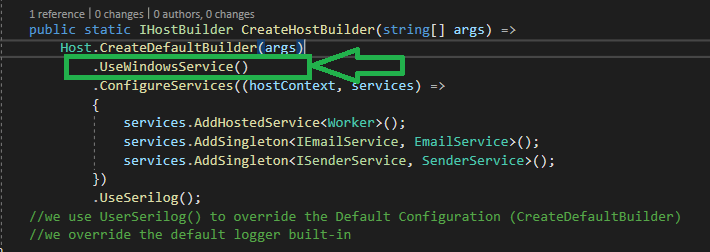
Ok, a worker service can run in different operating systems but we want to install this service in Windows. Then, how do we need to say to the framework: “Hey mate, this worker service has to run in Windows”?
First, we need to install a specific NuGet package for hosting this worker service in Windows.
>Microsoft.Extensions.Hosting.WindowsServices

Finally, we need to say to the framework “hey, this background service runs in windows” for this reason, we need to use the extension method: UseWindowsServices();
That’s all 😉 we are ready to run in windows like a champ 😉
Publishing our Worker Service 😮
Right-click in the solution –> Publish!
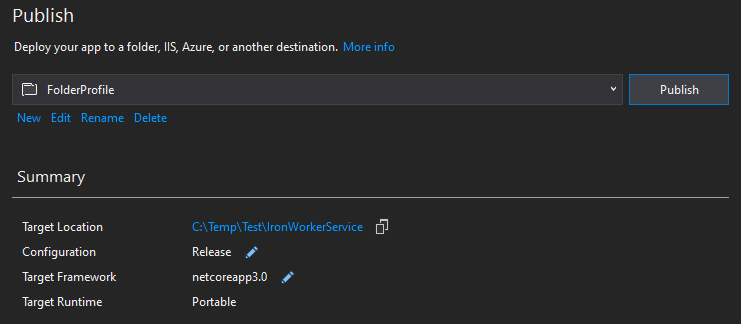
In the release folder, we can see a lot of files but we will use IronWorkerService.exe to install our worker service.
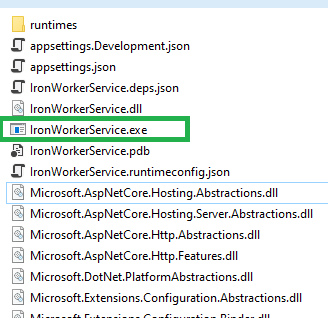
Ok, let’s open a power shell console as ADMINISTRATOR
Then we are going to use the Service Control Manager Tool (sc.exe) to INSTALL the service.
>sc.exe create WINDOWS_SERVICE_NAME binpath= EXE_PATH start= START_TYPE
(*)You need to replace the uppercase values to the correct values.

Let’s check if the service was created 😉
Press: windows + r ==> and write: services.msc
After that, you can see all the windows Services

Yeahh! We can see our service! Then, we need to do a right-click and start!
After that, we need to check the status of the service, to do that we will check the log!
Excellent, when we start the service, the log file was created and our service is running correctly 😉
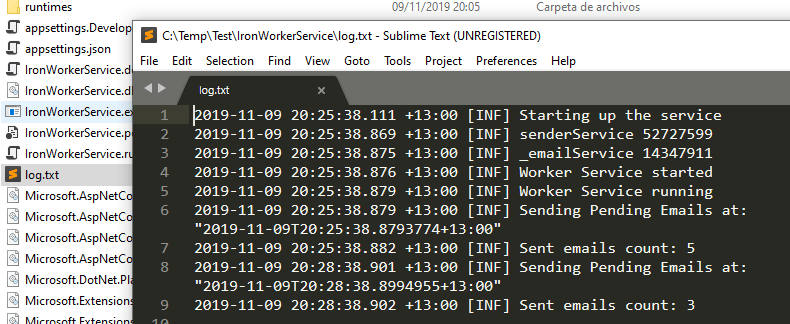
That’s great ! 😀
Finally, we will uninstall the service to do that, first, we need to STOP the service and then, we have to open a PowerShell Console as ADMINISTRATOR again.
>sc.exe delete WINDOWS_SERVICE_NAME

That’s all 😀 The service was uninstalled 😀
Ok, we could code a complete example to work with service workers.
I hope you have enjoyed that 😀
You can see all the code on my GitHub
Big hug 😀
1 thought on “Worker Services – Net Core 3.0”
Leave a Reply
You must be logged in to post a comment.
Hello! I just would like to give a huge thumbs up for the great info you have here on this post. I will be coming back to your blog for more soon.